
Windows 7 is Engineered for speed. The Windows team has given special attention to making Windows 7 faster than the previous operating systems. Windows 7 has proven to be much faster than Windows Vista, but even then, most of us don’t get satisfied with it. Many still have their old PC. Installing Windows 7 won’t be as soothing as it would work with XP, and even with the latest hardware installed, some users would still be greedy for more performance. So, if you’d like to squeeze out the best from your OS, read on the Ultimate Guide, we have provided To Speed Up your Windows 7. Although if you are looking for speedingup windows 7 for the gaming purposes then the hardware plays alot more role actaully, we recommend you to checkout the list of best gaming laptop under 1500$ which can fulfil your gaming needs & wants easily.
Table of Contents
- Minimum Requirements You need To Run Windows 7
- The Ultimate Guide to Speed up Windows 7
- List of services in Windows 7 that can be safely set to manual/disabled
- Disable the User account control (UAC) Feature in Windows 7
- SetUp the Windows 7 Ready Boost Service for an Extra Speed Boost
- Turn off Unused Windows 7 Features
- Speeding Up, Tweaking, and Optimising Your SSD
- Disable the Windows 7 Sidebar (The Gadgets)
- Disable the Aero Peek, and Aero Snap features in Windows 7
- Change the Power Plan To Maximum Performance
- Disable the Thumbnail Preview Feature to speed up File browsing in Windows 7
- Useful Software To Speed Up Windows 7
Minimum Requirements You need To Run Windows 7
- 1GHz processor (32- or 64-bit)
- 1GB of main memory
- 16GB of available disk space
- Support for DX9 graphics with 128MB of memory (for the Aero interface)
- A DVD – R/W drive
So, let’s start;
The Ultimate Guide to Speed up Windows 7
Disabling the Search Indexing Feature in Windows 7
- Right-Click the “Computer” icon from the Desktop and select “Manage.”
- Click “Services and Applications” in the “Computer Management” window.
- Click on “Services.”
- You’d see many services being listed inside the window. Find “Windows Search” from the list.
- Right Click on “Windows Search” and choose “Properties.”
- The “Windows Search Properties Window” will open up. From “Startup type,” click on the drop-down menu and choose “Disabled.”
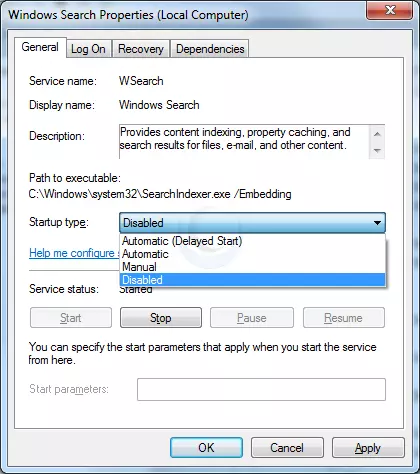
- Click “Apply” then “OK,” and that’s it. The Windows 7 Search Indexing Feature is now disabled.
Most Windows 7 users are not likely to do frequent file searches in their system. The Search Indexing service in Windows 7 will index and keep track of the files so that they can be found out quickly when needed.
This feature is useful only if you perform frequent searches on your system. For those who don’t rely much on the windows search, the Search Indexing service in Windows 7 can be disabled as it would hog up resources. If you’d like to disable the search indexing feature in Windows 7, you may set the Search Indexing Service to Disabled (See the above method about disabling unwanted services).
Disable the Aero Theme on Windows 7
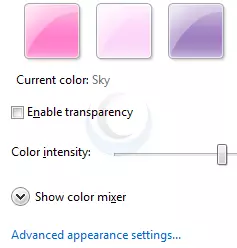
- Right Click on your Desktop and select “Personalise” click the Window Colour Tab.
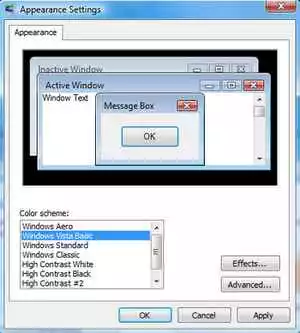
- Uncheck the box saying “Enable Transparency” and click on “Open classic appearance properties for more color options.”
- You may also Apply a Standard or Basic theme from the previous window. The Standard Windows 7 theme is more preferred as it gives a neutral look than the classy windows old theme.
The aero user interface certainly adds some “Eyecandy” to Windows 7, but it requires good hardware and system resources to run smoothly. Older graphics cards would be squeezed to their maximum when aero is forcefully enabled. So if you are on the same line, Disabling the Aero in Windows 7 certainly adds an extra speed boost.
Disabling the Aero theme in Windows 7 will speed things up as the hardware could now be allocated more resources, and you could try checking the memory consumption when aero is turned on and off.
Disabling the Unwanted Visual Effects in Windows 7
- Right-click on” Computer” and select “Properties” from the right-click menu.
- Click on “Advanced System Settings” from the left pane to open up the “System Properties” window.
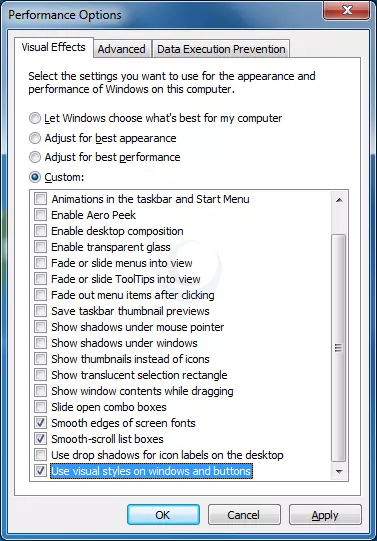
- Select the “Advanced” tab from it. Then Under “Performance,” click “Settings.” Choose” Custom:” Options From it.
- Now un-tick all the options (Choose “Adjust for best performance “) and select only the last four options (actually three are preferable; you may un-tick the second option out of the previous four). Take a look at the screenshot below.
- Now log off your system and login again.
Even though we have turned off the aero effects in Windows 7, there are still many unwanted visual effects that could be safely disabled to speed up Windows 7 performance.
Disabling the Unwanted Services to Speed up Windows 7
There are many services in Windows 7 that we don’t depend on for our daily use. There are some exceptional cases, in any case. Services such as “print spooler” are used only when needed to print a document. If you don’t own a printer, you could safely turn off that service in Windows 7 and turn it on only when there is a need to take a print.
List of services in Windows 7 that can be safely set to manual/disabled
Disabling the unneeded services in Windows 7 can also speed up the system boot time.
Disable the User account control (UAC) Feature in Windows 7
Disabling UAC is recommended for advanced users only; it’s not recommended to do it if not.
- From the Control Panel, open the “User Accounts and Family Safety“> User Account.
- Click the User Account Control settings link.
- Now Drag the Slider towards “Never Notify.”
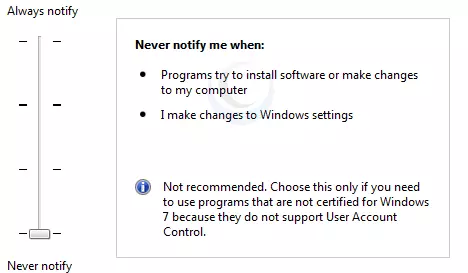
- Click “OK” and Reboot your system.
The User account control (UAC) feature in Windows 7 is very annoying for experienced windows users, and for others, it could protect your pc from harmful virus activity, etc. If you do software installations more frequently on your system, turning off the UAC feature would save you extra time.
SetUp the Windows 7 Ready Boost Service for an Extra Speed Boost
- To configure the Ready Boost Feature in Windows 7, you need to have a high-speed USB Flash Drive, which is ready boost compatible.
- After plugging your pendrive, open “Computer“> Right-click the on USB Drive/Pen Drive > select “Ready Boost” tab > tick the “Use this device” checkbox.
- You may configure the amount of space on your Pendrive to be used as Ram.
The ready boost feature in Windows 7 will help you use your USB flash drive as Ram, thereby improving the performance and speed of windows seven greatly. You’d certainly experience it when launching bulky applications such as Adobe Photoshop.
Note: Ready Boost would be beneficial for systems with a low amount of ram installed (less than 1GB).
Turn off Unused Windows 7 Features
- Open up “Programs and Features” from the Control Panel.
- Click the “Turn Weffectindows features on or off” from the left pane.
- Now uncheck all the features you don’t use in Windows 7 and restart the system for the changes.
There are many features in Windows 7 that we often don’t use. Disabling these new features in Windows 7 would help in speeding things up.
Speeding Up, Tweaking, and Optimising Your SSD
If you’ve got a new SSD for your system, you should consider checking out this guide that explains nine tweaks to properly speed up, optimize your SSD, and prolong the life of your SSD while getting the best performance from it.
Disable the Windows 7 Sidebar (The Gadgets)
- Right-click on the sidebar and choose “Properties.”
- Windows untick the checkbox showing “Start sidebar when Windows Starts.”
- The windows sidebar won’t start when Windows 7 starts up.
Disabling the window 7 sidebar helps you free up resources and gain a few more seconds during startup time.
Disable the Aero Peek, and Aero Snap features in Windows 7
Aero Snap will help you maximize, minimize, and resize the windows by dragging and dropping them into the screen corners.
I won’t advise you to turn off this useful feature, as the Aero Snap feature helps speed up working with windows by arranging them. But, if you are not a regular user of the same, you may proceed by turning off aero snap-in windows 7.
- Open the Windows 7 “Control Panel” and double-click on the “Ease of Access Centre” icon.
- Now click on the “Make it easier to focus on tasks” seen at the bottom.
- Now untick the checkbox saying, “Prevent windows from being automatically arranged when moved to the edge of the screen.”
- Right-click on the Windows 7 taskbar and select “Properties.”
- Now untick the “Use Aero Peek to preview the desktop” option from there.
- Now To Disable the Aero Peek feature in Windows 7
- The Aero Peek feature in Windows 7 helps you peek through all open windows by hiding all other windows and showing only the outlines of all windows. Aero Peek is similar to the “Show Desktop” Feature in XP and Vista.
- If you have followed step 3, then Aero Peek will be automatically disabled. If not,
- Right-click the Taskbar and choose Properties. Un-select the “Use Aero Peek to preview the desktop” option.
- The aero peek feature will now be disabled in Windows 7.
Change the Power Plan To Maximum Performance
- Double click the “Power Options” in the Control panel.
- Click the down arrow showing “Show Additional Plans” to see the “High Performance” power plan.
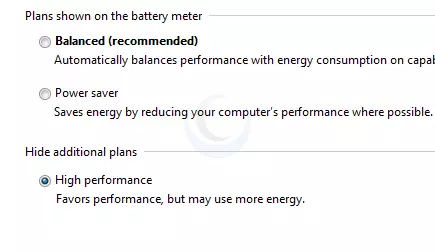
- Now activate the “High Performance” plan, and that’s it.
- You may go for the advanced settings for further tweaking if you want.
The Power settings in Windows 7 are not automatically set for maximum performance. By default, the power plan in Windows 7 is set for a balanced performance with energy consumption on hardware. So you may not get the optimal performance from windows 7 in this case. So we need to change the power plan to High-Performance Mode.
Disable the Thumbnail Preview Feature to speed up File browsing in Windows 7
For disabling thumbnails in Windows 7;
- Double Click on “Computer“>click on the “Organise” drop-down menu and select the “Folder and Search Options.”
- Under ‘The files and Folders section, go to the “View” tab and tick the check box showing the “Always show icons, never thumbnails” checkbox.
The thumbnail preview feature in Windows 7 will show the small thumbnails of the contents of a folder instead of showing its icon. But this feature does take up some system resources by generating thumbnails when you view a folder and keeps building up the cache. So by disabling the Thumbnail Preview feature, the file browsing can be speed up.
Useful Software To Speed Up Windows 7
- Razer Game Booster
- CCleaner
- TCP Optimizer
- TeraCopy
- Soluto
To maintain Windows 7 Performance and keep it up in Top Shape, some very essential software could be of great help to Speed Windows 7. I will list some of them here. You may download and install these utilities. Make sure that you run these utilities at least once a week. If you are regular at this, Windows 7 will be in top shape every time.
You may check this post which tells Tools To Speed Up Your PC.
Turn OFF Windows 7 Password Protection To save a few More Seconds!
If you’ve set a password for accessing your user account in Windows 7, you’d need to enter it every time you log in to windows. Without entering any password, logging into Windows automatically will save you a few seconds. If you are the only person who uses your computer, I’d recommend turning this off. If not, you may skip this step.
How to Automatically Login to Windows 7 without entering any username or password
Disable Unwanted Startup Items for Speeding Up Windows 7 Startup
- Type “msconfig” in the “RUN” option from the start menu press [Enter] to open up the System Configuration Utility.
- Now navigate to the “StartUp” tab.
- Un-tick the Entries which are not needed
When you have installed much software on your PC, there might be many services that would start along with windows. For example, software such as ACDSee will run services such as device detectors during the system startup. These are of no use for regular windows users (unless you transfer photos to your pc via a camera). So preventing such services from starting up along the windows 7 startup session can result in quicker startups.
Disable Unwanted System Sounds in Windows 7
- Type mmsys.cpl in RUN From the Windows 7 Start Menu search box and press [Enter].
- Navigate to the “Sounds” tab.
- Now from under “Sound Scheme:” select “No Sounds“> Click “Apply“> “OK“.
- You may keep some of your favorite sounds turned on if you want, but sounds played during the Windows 7 startup, shutdown, logon, logoff, start navigation, etc., should be set to none if you want some real speed boost.
To play the sounds you hear in Windows 7, system resources are being utilized. So if you could disable these sound effects, that would successively free some system resources.
That’s it! Following all these steps will certainly boost the speed and performance of your windows 7 operating system.
For more information on guides and operating systems, check the Software section on this site.
You may also be interested in How Many Watts Does a Gaming Laptop Use?


I think the admin of this website is really working hard for his web
page, as here every data is quality-based data.
Thanks for the compliment!